Discover how to manually deploy and remove the Actifile Windows Agent using the MSI installer.
Installation
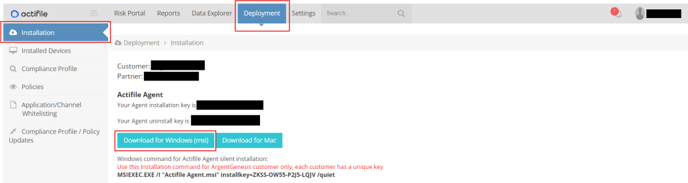
Step 1. Open the Actifile portal and navigate to Deployment > Installation. Click Download for Windows (MSI).
Old interface:
New interface:

Step 2. Double-click the Actifile_Agent.msi file and follow the instructions of the installation wizard. Once the process is complete, enter your install key in the pop-up window and click Sign In.

Step 3. Open the my.actifile.com portal and select Deployment > Installed Devices. Your computer will appear in the list under your Windows PC name.
Old interface:

New interface:

The Actifile agent has started scanning your files.
Uninstallation
- To uninstall the via the Actifile portal, refer to these instructions.
- To remove the agent using the MSI file, follow the steps below.
Step 1. Open your system settings and navigate to Apps > Installed apps.

Step 2. Find the Actifile agent, click three dots next to its name, and select Uninstall.

Step 3. Enter your uninstall key in the popup window that appears and click Uninstall. Need help finding the key? Check out this article.

Step 4. Go to my.actifile.com and navigate to Deployment > Installed Devices. Your device will appear in the list as uninstalling or uninstalled. The updated status may take a few minutes to display in the interface.
Old interface:

New interface:

The Actifile agent is successfully uninstalled from your device.