Learn how to monitor files on cloud platforms and email services with Actifile. This guide compares the Local Agent and Cloud & NAS Agent and covers setting up one-time and continuous scans.
Actifile allows you to monitor files stored on cloud platforms or shared via email. It supports the following services:
- Microsoft OneDrive, SharePoint, and Outlook (including shared Microsoft 365 files)
- Google Drive and Gmail
- Dropbox
Note: The Actifile agent only scans email attachments, not the email body.
There are two ways to set up cloud drive monitoring:
- Synchronize the desired platform with a Windows machine and use the regular Local Agent for Windows.
- Use the Actifile Cloud & NAS Agent.
Here is a comparison of these two options.
Functionality:
| Local Agent (Windows) | Cloud & NAS Agent | |
| Encryption | ✅ | ❌ (available in the next release) |
| Files not synced with the desktop | ❌ | ✅ |
| One-time scan | ❌ | ✅ |
| Storage platform-based classifiers | ✅ | ✅ |
Supported platforms:
| Local Agent (Windows) | Cloud & NAS Agent | |
| Google Drive | ✅ (if synced to Windows desktop) |
✅ |
| Microsoft OneDrive | ✅ (if synced to Windows desktop) |
✅ |
| Microsoft SharePoint | ✅ (if synced to Windows desktop via OneDrive) |
✅ |
| Dropbox | ✅ (if synced to Windows desktop) |
❌ |
| Email attachments (Outlook, Gmail) | ❌ | ✅ |
Scan Cloud Platforms with the Local Agent
Scanning cloud services with the Local Agent is simple:
Step 1. Set up full synchronization of the desired platform (Microsoft OneDrive, Google Drive, or Dropbox) to a Windows machine.
Step 2. Run the Local Agent on the machine.
The agent will scan and encrypt your files as if they were stored locally on the device.
Scan cloud platforms with the Cloud & NAS Agent
The Actifile Cloud & NAS Agent allows you to perform full scans of your cloud platforms either once or continuously at set intervals.
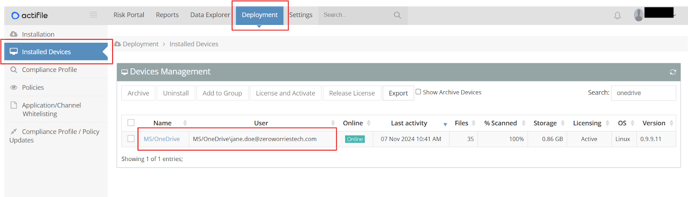
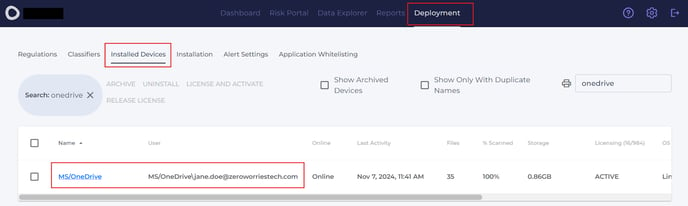
Once the agent is deployed, each cloud drive will appear in the Installed Devices section as a separate device under your Microsoft or Google user’s name. Go to Deployment > Installed Devices to view the list.
Old interface:
New interface:
One-Time Scan
When you perform a one-time scan, the agent will stop after reviewing all your files. This option is a good choice for scenarios where you need to quickly assess the current state of the data.
Use cases:
- Initial data assessment when onboarding Actifle.
- Before migrating data from on-premise systems or cloud storage, scanning ensures no sensitive files are left exposed.
- You can run a one-time scan to identify outdated or unnecessary sensitive files before archiving or deletion.
- When preparing for compliance audits, a one-time scan can give a snapshot of data compliance.
For detailed instructions on running a one-time scan, refer to:
– One time scan of cloud drives and email attachments
Continuous Scanning
For real-time oversight and protection, set up continuous scanning. The easiest way to enable it is by deploying the Actifile agent on a Microsoft Azure virtual machine. If you don’t have an Azure subscription or prefer local resources, you can deploy the agent locally with Docker.
You will find setup instructions here:
– Deploy the Cloud Agent on Azure VM
– Deploy the Cloud Agent locally with Docker
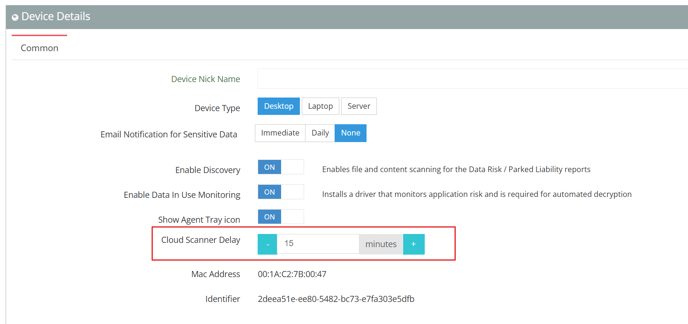
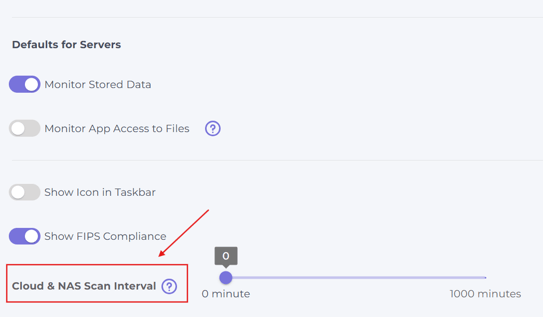
You can configure the scan interval in the device settings. Navigate to Deployment > Installed Devices, find your cloud drive, and click its name to open the settings. Locate Cloud Scanner Delay and enter a value from 0 to 1000 (in minutes). Save changes (in the new interface).
Old interface:
New interface:
The Cloud Scanner will review files based on the specified interval. For data that isn’t frequently used, you can choose longer intervals to optimize performance. Setting the scan delay to 0 will prompt the agent to start a new scan immediately after completing the previous one.