This guide walks you through running the agent, verifying its status, and ensuring your NAS device is continuously scanned. Additionally, you'll learn how to enable automatic updates to keep your agent up to date.
Run the scan
Follow these steps to run the scan.
Step 1. Start by installing Docker on your device. For detailed instructions, refer to your device manufacturer’s guide. For instance, this article provides a step-by-step guide for installing Docker on a Synology NAS.
Step 2. Open your command line interface and run the following command, replacing placeholders with your values.
- YOUR_HOSTNAME > choose a hostname that the agent will use to generate a unique ID for each scanned drive.
- YOUR_INSTALL_KEY > your Agent Install key. This article explains where to find it.
- YOUR_DEVICE_NAME > choose a meaningful name for your device.
- YOUR_TARGET_FOLDER_PATH > the full path to the drive/folder you want to scan.
- YOUR_CACHE_FOLDER_PATH > the full path to the folder where the agent will store the cache (can be omitted).
Note: If you redeploy the agent for the same drive, ensure you use the same hostname; otherwise, the agent will treat the drive as a separate device.
You can either run the latest version of the Docker image available locally or automatically check for a more recent one.
To start the latest version of the Docker image available locally, run this:
docker run -d --name=actifile -e AGENT_HOST_NAME=YOUR_HOSTNAME -e AGENT_KEY=YOUR_INSTALL_KEY -e AGENT_DEVICE_NAME=YOUR_DEVICE_NAME -v YOUR_TARGET_FOLDER_PATH:/data:rw -v YOUR_CACHE_FOLDER_PATH:/cache:rw -v /etc/localtime:/etc/localtime:ro --init docker.io/actifile/actifile-nas:latestExample:

To check for a more recent version, go for this command:
docker run -d --pull=always --name=actifile -e AGENT_HOST_NAME=YOUR_HOSTNAME -e AGENT_KEY=YOUR_INSTALL_KEY -e AGENT_DEVICE_NAME=YOUR_DEVICE_NAME -v YOUR_TARGET_FOLDER_PATH:/data:rw -v YOUR_CACHE_FOLDER_PATH:/cache:rw -v /etc/localtime:/etc/localtime:ro --init docker.io/actifile/actifile-nasExample:

Note: You can update the Docker image automatically to ensure you always use the most recent version of the Actifile agent. For instructions, go to the auto-update section.
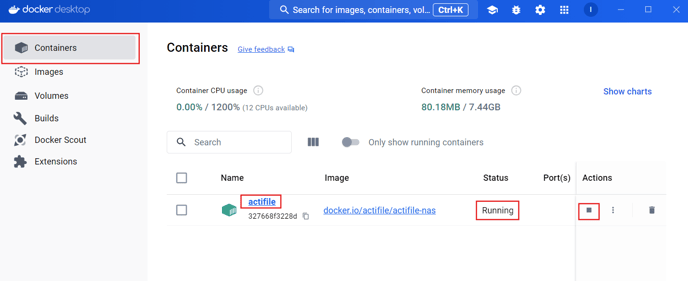
Step 3. Open the Docker Desktop app and navigate to the Containers tab. The Actifile Docker container will appear on the workspace. The agent will scan your documents as long as the container’s status is running. To pause the scanning process, click the stop button.
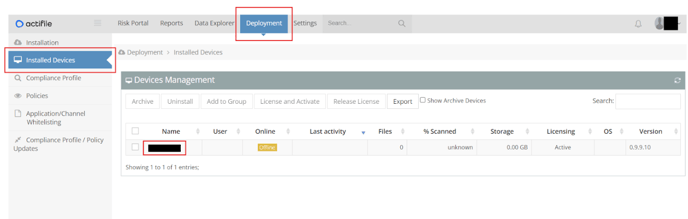
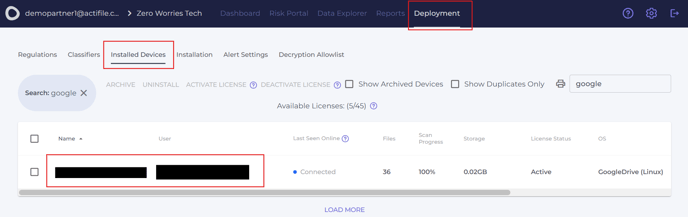
Step 4. Open the my.actifile.com portal and select Deployment > Installed Devices. Your device will appear in the list under the name you chose earlier.
Old interface:
New interface:
You successfully deployed the continuous scan of your NAS device with Docker.
Auto-update the agent
You can automatically update images to ensure you are always running the latest version of the agent.
Step 1. Before proceeding to the next step, ensure your Docker Desktop app is running.
Step 2. Open your command line interface and run the following command, replacing the placeholder with your value.
- YOUR_INTERVAL > the interval in seconds when the agent will pull the newest Docker image.
docker run -d --name watchtower -v //var/run/docker.sock:/var/run/docker.sock docker.io/actifile/watchtower -i YOUR_INTERVAL --cleanupExample:

Note: We use Watchtower to update Docker container base images automatically. For more information, refer to Watchtower’s official documentation.
Step 3. Open the Docker Desktop app and navigate to the Containers tab. The Watchtower Docker container will appear on the workspace. Watchtower will monitor updates as long as the container’s status is running.

Now, Watchtower will automatically check for new images and restart the container with the same configurations.